Friday, April 29, 2011

New Digs for Portland's Nature: Urban Bird House

No, that post title doesn't mean this blog is moving, it means that there's some new real estate available for some lucky members of Portland's avian society.

I just put up a bird house!

It's my first attempt at supplying a home for that segment of Portland's population, and I'm hoping some happy little bird couple finds it before the wasps do.
Home Sweet Home

This great little house was constructed by my Dad, who it seems, has been on a bird house-making spree as of late. He had all sorts of models to offer me. Houses for hanging in trees, houses for attaching to buildings or posts... I chose the post-mountable option, because I have a distinct lack of trees large enough to support a hanging bird house. (Something I hope to correct with my native landscape plan, given a few years of tree growth.)
Ivy Fortress
 I put the house on top of a post, on an ivy-covered fence.  (I know, I know - ivy is a horrible plant.  I didn't plant it, and I keep it under strict control.)  I thought the ivy would provide some protection from cats and racoons, and make it seem a little more woodsy.

When I got the house home, I wanted to check online to see if I could find some information about proper hole sizes for Oregon's native species.   I found a lot more than I bargained for.

According to an experienced birder and Oregon bird house-builder, Dick Lamster, the 1 1/4 inch hole size of my bird house is perfect for keeping out non-native species like European Starlings and House Sparrows.  (I knew that Starlings were aggressive invasives, but House Sparrows?  They're so cute.)  Mr. Lamster wrote this article for the Lane County Audubon Society.  It's got some good information, but also some discouraging points.  His rule number one?

If you maintain birdhouses that are being used by European starlings or house sparrows (also called English sparrows), for the sake of our native birds, you must destroy the nest and eggs.
That's enough to make any urban bird real estate developer cringe, and his rule #2 doesn't make it any better...

In most cities, only starlings and house sparrows will nest in the birdhouses that people maintain.
As Charlie Brown would say... Good grief! What's a guy to do?

Well, as I mentioned before, the hole size on this house should keep the would-be blood off of my hands, but is the house doomed to being a bird-free wasp house?  Maybe I should have put up a Mason bee house instead?  Only time will tell.  For now, I'm keeping my fingers crossed.  Maybe I should put out a sign... "One Bedroom - CHEEP Rent!"

For some more guidance on bird house dimensions (hole size, floor depth, etc.), check this link to Wild Bird Watching.  And for more information about NW cavity nesters, check this post over at Northwest Nature Notes.

And let me know what your experience has been with urban bird houses.  Had any success?  Some Portland locations are better than others (I'm thinking about you, Slugyard), but I'm fairly close-in SE here.  So pretty urban.  I'll provide an update as soon as I notice signs of anyone moving in (bird, wasp, or otherwise).

Wednesday, April 27, 2011

Nature Word of the Week: Accidental

This week's Nature Word is: Accidental

We all know the meaning of accidental in every day speech, so we probably have a good idea of what it would mean when used to describe species occurrence.  But let's take a closer look at this and other words used to talk about how often a particular species is seen in a given area.  (These words are most commonly used in reference to bird species, but they could also apply to any highly-mobile group of animals.)
Image credit: University of Columbia, SECAC, NASA, via Wikipedia

Merriam-Webster lists three definitions for accidental, but the one that fits best, when describing species occurrence is this: 
occurring unexpectedly or by chance
The National Audubon Society Field Guide to North American Birds (Western Region, second edition, August 2000) defines accidental as:
A species that has appeared in a given area only a very few times and whose normal range is in another area.
Accidental species then, probably took a wrong turn at Albuquerque.


At the opposite end of the occurrence scale, we have the term permanent resident.  This, of course, is self-explanatory - it describes an animal species that lives in the area all year round.  You could also have a winter or summer resident if the species is migratory (moving between a winter range and a summer range). 

Somewhere in the middle of the scale, we have a couple of different terms:
  • Casual - A species that has appeared in a given area somewhat more frequently than an accidental, but whose normal range is in another area.  (The National Audubon Society Field Guide to North American Birds Western Region, second edition, August 2000)
  •  Erratic - Occurring in numbers some years, but very scarce or even absent in others.  (US Fish and Wildlife Service)
You could also use erratic in conjunction with migration, to describe an erratic migrant - a species that moves through an area in some years but not others.

Related to species occurrence, we have a whole list of terms which describe species distribution or range (Definitions below from The National Audubon Society Field Guide to North American Birds Western Region, second edition, August 2000):
  •  Circumpolar - Of or inhabiting the Arctic (or Antarctic) regions in both the Eastern and Western hemispheres.
  • Cosmopolitan - Worldwide in distribution, or at least occurring in all continents except Antarctica.
  • Equatorial - Of or inhabiting the equatorial regions.
  • Local - Occurring in relatively small, restricted areas within the range, rather than commonly and widespread throughout the range.  (Species whose occurrence is local usually have highly specialized habitat requirements.)
  • Pelagic - Of or inhabiting the open ocean.
  • Riparian - Of or inhabiting the banks of rivers or streams.
  • Subalpine - Of or inhabiting/pertaining to the stunted forest or other vegetation immediately below the treeless, barren alpine zone on high mountains.
  • Woodland, coastal, etc.,

Tuesday, April 26, 2011

Critters on the Urban Landscape: Forest Park

This sounds like an interesting evening for any Portland nature lover.  I hate to miss it but I'll be out of town.  If you go, let us know how it was.

From Henry Miller, via the Salem Statesman Journal's Get Outdoors blog:


On May 4, John Deshler, a wildlife biologist, and Barry Sims, a forester, will talk about the creatures that go bump in the night, and during the day, at Portland’s Forest Park, from  northern pygmy owls to raccoons.
The two are guest speakers at the final session of the Discovering Wildlife speakers series sponsored by the Oregon Wildlife Heritage Foundation.
The presentation is at 6:30 p.m. at the Billy Frank Jr. Conference Center at the Ecotrust Building in Portland’s Pearl District, 721 NW Ninth Ave.
Admission is free, but registration is required.
Contact: (503) 255-6059.

Thursday, April 21, 2011

Creating a NW Native Landscape: Part Four - In With the New

In part three of this series, I told you about removing existing lawn and landscape plants to create a "blank slate".  With that done, we can prepare the site for the new landscape installation.

I mentioned briefly before that now is the time to install any hardscapes and correct any slope issues.  Make sure that your soil slopes gently away from foundations, to prevent basement or crawlspace moisture problems.  If you want to create small mounds or berms, you can use dirt (or some of your removed sod) to do that now.  Are you installing a paver patio?  Do you want to create a rain garden that catches water from your disconnected downspouts?  (Mike, over at Slugyard, just built a nice rain garden.)

The only hardscape improvements that I installed during my re-make, were a gravel patio and a low retaining wall constructed with landscape block (home centers have many sizes and varieties of interlocking blocks).  We didn't have room in our yard for a full-blown rain garden, but I did want to create a catchment for the runoff from one disconnected downspout.  The water flows through a pipe under the patio, and into a gravel-filled hole.  Any overflow is channeled through a mini "creek" toward the street.

Gravel patio with plastic edging, and low retaining wall.  The gravel "creek" is actually a gravel-filled hole near the patio, where the drainage from a downspout is collected, then the overflow would drain toward the sidewalk.
You have to be careful when you're disconnecting downspouts and creating new drainage points.  You want to make sure that you have enough area to hold the water while it soaks in to the ground, which depends on how large of a roof area you're draining.  There are some rules, too, about how far from adjoining property lines a drainage point must be.  You can get some good information about that and other things to consider (plus information about the disconnection incentive program), from this PDF by the City of Portland Environmental Services:
http://www.portlandonline.com/bes/index.cfm?c=43081&a=177702

With all of your slope issues corrected and your hardscapes installed, it's time to think about weed barrrier.  There are various landscape "fabrics" available from any home and garden center.  These materials allow air and water to pass through, but prevent weeds from growing up, or from penetrating down to get established in the soil.  For greener options, there are choices like newspaper or cardboard.  Either can be laid out in the desired shape, then wet thoroughly to stay in place.  I didn't have a good source for old newspaper, and since I was working on a rental property I really wanted to take the easiest path to what I felt would be the best weed prevention for a low-maintenance yard.  I opted for the landscape fabric.  I would never recommend using plastic of any kind, which would rob the soil of oxygen and moisture.  And another note: I was creating what would be a fairly static landscape once complete.  If you're going to be doing a lot of transplanting and ongoing gardening in your yard, I wouldn't use landscape cloth at all - or not in those areas, anyway.  If you'll just be adding plants over time, the cloth works fine - you can pull the mulch aside and cut a new hole.  Actually I cut a "plus sign" in the cloth, then fold the corners under to create a square opening.  After you put the plant in, you can then pull the corners back out to cover as much of the exposed dirt as possible. 

Landscape fabric being covered with Hemlock mulch
The landscape fabric usually comes with some metal, U-shaped "staples" which can be pushed through the fabric and into the ground, to hold the fabric in place.  I would suggest buying an extra box (at least) of the staples - especially if you have lots of curves in your design.  The more involved shapes generally require more staples than a straight run.  I would also suggest starting with any straight runs that you do have first, then coming back and trimming in the curves or small sections.  You'll want to overlap each row by a few inches.  Don't waste staples by stapling down both edges of your first row.  Where the rows overlap, you can use one staple to go through two layers.  One other tip... If you're putting fabric down on a slope, start at the bottom with your first row, and work your way up - just like you would with roofing shingles.  That way, when you're putting the mulch on, it won't slide underneath the upper edge of each row and create a problem.

Ready to cover up your landscape cloth or newspaper?  What kind of mulch do you want to use?  There are plenty of choices out there - standard bark mulch (of which there are many kinds), nut shells, pine needles, leaf mulch, rock, recycled rubber mulch, and the list goes on.  They all have pros and cons, some of which are listed on LoveToKnow.  For my landscape, I chose medium Hemlock bark.  I like the rich, natural color and most of all, I like the fact that Hemlock bark does not have the tiny slivers that fir bark does.  You can get your hands dirty without fear of splinters!

There are endless sources of bark dust and other mulching materials, from bagged quantities at your local home center, to pick-up loads from your landscape supply or "fuel" companies around town.  You can definitely save some money by going with the pick-up load.  They'll load it in seconds with their heavy machinery, and they typically measure by the yard (cubic yard).  Even the smallest of city trucks like mine can hold a yard, and they generally will sell a half yard if you don't need that much.  You can have it delivered as well.  How much mulch does a mulch buyer need?  There's a handy guide to help you figure it out, over at About.com.  Our source for gravel of all sizes, landscape rock, and mulch is Mt. Scott Fuel, on SE Foster Road.  I would recommend them to anyone in SE Portland.

With such an open, clean slate to work with, spreading the mulch is easy.  Just use a shovel to transfer it from truck to wheel barrow, dump the wheel barrow, and use a metal rake to spread the mulch to about 3" deep.

That's probably enough work for one day, and it's a good stopping point for this post.  So next time, in the fifth and final part of this series, we'll take a look at some basic planting principles, some good native plant choices, and some local sources, too.

Until then, thanks for reading!

Another "creek" - installed over the landscape fabric, to accommodate disconnection of the pictured downspout.

Stylish Blogger Award: I Won!

I don't like tooting my own horn, but...

                                      I won the Stylish Blogger Award!

What an honor for such a recent arrival to the blogosphere!

Sarah, over at Hood Photo Blog, was kind enough to include me in her list of bloggers receiving the Stylish Blogger Award.  Sarah writes one of my favorite blogs, featuring some really beautiful photos and observations of the Mt. Hood area.

The award comes with some rules about how to share the love (below).  Choosing who to pass the award on to is the easy part (check recent posts from some good contenders in the sidebar).  It's the "share 7 things about yourself" part that will take a little time and thought.  For now, I just wanted to say thank you - to Sarah and to my readers.

Stylish Blogger Award Rules:

1. Thank and link back to the person who gave you the award.
2. Share 7 things about yourself.
3. Award 10-15 blogs who you think deserve this award.
4. Contact these bloggers and let them know about the award.

Wednesday, April 20, 2011

Nature Word of the Week: Pinnate

This is the first posting of a new weekly feature... Nature Word of the Week.  Every Wednesday, I'll define a different nature-related word.  I'll try to mix it up, referencing different sources and choosing words of varying obscurity or technical level.  Probably nothing new for the professional scientist-types out there, but hopefully interesting or even instructive for casual nature observers like me.  I know I'll be learning as I create these posts.

So without further ado (OK, maybe just a little trumpet fanfare), the Nature of Portland proudly presents the very first, Nature Word of the Week!

This Week's Nature Word is: Pinnate

From Wiktionary.org:

  1. Resembling a feather.
  2. (botany) Having two rows of branches, lobes, leaflets, or veins arranged on each side of a common axis

Pinnate leaves on a palm tree in the Phoenix genus - credit: Mmcknight4 via Wiktionary
From Wikipedia.org:

Botanically, the term describes an arrangement of discrete structures (such as leaflets, veins, lobes, branches, or appendages) arising at multiple points along a common axis. For example, once-divided leaf blades having leaflets arranged on both sides of a rachis are pinnately compound leaves. Many palms (notably the feather palms) and most cycads and grevilleas have pinnately divided leaves. Most species of ferns have pinnate or more highly divided fronds, and in ferns the leaflets or segments are typically referred to as "pinnae" (singular "pinna"). Plants with pinnate leaves are sometimes colloquially called "feather-leaved".

pinnatifid and pinnatipartite: leaves with pinnate lobes that are not discrete, remaining sufficiently connected to each other that they are not separate leaflets.
pinnatisect: cut all the way to the midrib or other axis, but with the bases of the pinnae not contracted to form discrete leaflets.
pinnate-pinnatifid: pinnate, with the pinnae being pinnatifid.
paripinnate: pinnately-compound leaves in which leaflets are born in pairs along the rachis without a single terminal leaflet; also called "even-pinnate".
imparipinnate: pinnately-compound leaves in which there is a lone terminal leaflet rather than a terminal pair of leaflets; also called "odd-pinnate".
bipinnate: pinnately compound leaves in which the leaflets are themselves pinnately-compound; also called "twice-pinnate".
tripinnate: pinnately compound leaves in which the leaflets are themselves bipinnate; also called "thrice-pinnate".
tetrapinnate: pinnately compound leaves in which the leaflets are themselves tripinnate.

A pinnate frond of the fern, Blechnum appendiculatum - credit: Marshman via Wikipedia

Monday, April 18, 2011

Portland's Mill Ends Park: World's Smallest

A fairly well-known bit of Portland trivia, is that Portland's Forest Park is the largest urban forest in the United States.  A lesser-known fact is that Portland is also home to the world's smallest park - according to the Guinness Book of World Records.

Mill Ends Park is located in downtown Portland, right in the middle of Naito Parkway.  Most drivers and passers-by probably don't even notice the park as they go by, especially with the much larger Waterfront Park along the east side of the busy thoroughfare.  That's completely understandable, when you know that Mill Ends Park takes up roughly the same space as the base of a telephone pole.  In fact, that's exactly how the park came to be.

From Portland Parks & Recreation:
"In 1946, Dick Fagan returned from World War II to resume his journalistic career with the Oregon Journal. His office, on the second floor above Front Street (now Naito Parkway), gave him a view of not only the busy street, but also an unused hole in the median where a light pole was to be placed. When no pole arrived to fill in this hole, weeds took over the space. Fagan decided to take matters into his own hands and to plant flowers.

Fagan wrote a popular column called Mill Ends (rough, irregular pieces of lumber left over at lumber mills). He used this column to describe the park and the various "events" that occurred there. Fagan billed the space as the "World's Smallest Park." The park was dedicated on St. Patrick's Day in 1948 since Fagan was a good Irishman. He continued to write about activities in the park until he died in 1969. Many of his columns described the lives of a group of leprechauns, who established the "only leprechaun colony west of Ireland" in the park. Fagan claimed to be the only person who could see the head leprechaun, Patrick O'Toole. After Mill Ends officially became a city park on St. Patrick’s Day in 1976, the park continued to be the site of St. Patrick's Day festivities.

Over the years, contributions have been made to the park, such as the small swimming pool and diving board for butterflies, many statues, a miniature Ferris wheel (which was brought in by a normal-sized crane), and the occasional flying saucer. The events held here include concerts by Clan Macleay Pipe Band, picnics, and rose plantings by the Junior Rose Festival Court.

The park had to be moved temporarily in 2006 due to construction on Naito Parkway. It was replaced on March 16, 2007 in true St. Patrick's Day style with the Royal Rosarians, bagpipers, and the Fagan family, including Dick's wife Katherine, in attendance."
I visited the park recently, and snapped a couple photos.  The traffic was whizzing by, but the park was quiet.  In the lull after St. Patrick's Day, there was no sign of Peter O'Toole or any of the other leprechauns.

Oregon's capitol city, Salem, also claims to have the world's smallest city park.  But at 12 feet by 20 feet, Waldo Park could hold many Mill Ends Parks.   

There is a sign on the west side of Naito Parkway (at the corner of SW Taylor) that marks Mill Ends Park and provides a version of the information above.  While there are no trails in the park, the next time you're strolling, biking or skating through Waterfront Park, you should stop by to see what O'Toole and his clan are up to.


View Larger Map

Friday, April 15, 2011

Shiny Green Bug: What is it?

OK, this beetle does not technically fall within the Nature of Portland, but it comes pretty close.  I took these pictures a few years ago up along the Clackamas River, during the summer.  When I ran across this post over at Appalachia & Beyond, I remembered that I had these pictures and wondered if this was an Emerald Ash Borer.  But those are smaller (this beetle was about an inch long, if I remember right), and those also seem to be an eastern species.  So I thought - now that I have this blog - why not throw these pictures out there and see if anyone can identify the beetle.

This pic is a little fuzzy


No - I don't have the answer.  I did a quick search but didn't come up with anything before my attention span gave way.  I am interested.  I'd love to read about this particular beetle after someone does the ID work for me.  So my secret is out... I'm a lazy nature nut.

Notice the ridges in the elytra (hard forewings)


Any aspiring (or actual) entomologists out there?  If we don't come up with an ID within a week or so, I might submit the photos to What's That Bug?

The backdrop for these pictures is the fabric of a tent.  For those that aren't familiar with the Clackamas River area, it's part of the Mt. Hood National Forest, southeast of Portland (map below).  So conifer forest, near a river.  Elevation about 1250 ft.

OK - bring on the IDs!

Update: See comments below for the discussion - I think we have an ID!


View Larger Map 

the Nature of Milwaukie: Kellogg Lake Light Rail Bridge

TriMet's Portland-Milwaukie Light Rail Project will extend MAX service across a much-discussed new bridge over the Willamette River, and into Milwaukie, along SE McLoughlin Boulevard.  After traveling through downtown Milwaukie, the line will be elevated to cross over River Road.  I'm a big fan of public transportation and light rail in general, but as the project gets revved up, some Milwaukie and Oak Grove residents are rightfully concerned about the environmental impacts of this less talked about bridge.

The area adjacent to the planned bridge includes Kellogg Lake - an old mill pond that the city of Milwaukie has long planned to improve, by removing the dam and restoring the lake to wetland habitat.

Courtesy of TriMet: A rendering of TriMet's light-rail bridge over Kellogg Lake
 It sounds like TriMet has done a pretty good job of helping that vision come closer to reality.  The bridge design was revised to remove a support that would have been constructed in the lake, and TriMet has proposed to help restore the wetlands as part of the project.  Construction of the bridge will take place at a time least likely to disturb migratory fish,  and some old pilings in the lake will be removed.

That's all great, but some citizen's still have reservations about the design of the bridge itself.  An article in the Clackamas Review says it all in the headline - Ugliest Bridge in America?  In the article, by Raymond Rendleman, Oak Grove resident Les Poole is quoted as saying, "It's bound to be an inaccessible eyesore," referring to the 30-foot height of the steel and concrete structure.  Milwaukie City Councilor Dave Hedges said, “Somebody succeeded in producing for Milwaukie a bridge that would probably win the ugliest bridge in America contest.  That’s a beautiful part of Milwaukie, and you’ve destroyed it, and I’m somebody who thinks that light rail in a very broad sense is a good idea.”  Hedges urged TriMet to find ways to make the bridge blend in better with the environment, and I hope they can.  TriMet will be seeking public comment on the design throughout the year, so hopefully they can come up with some innovative ways to make everyone - residents, engineers, politicians, and wildlife - happy.  If these wetlands are restored, it will be a great compliment to the Johnson Creek - Willamette Confluence Project, happening just on the other side of downtown Milwaukie.

You can read the whole story over at Clackamas Review.


View Larger Map

Thursday, April 14, 2011

Spring Blooms at Crystal Springs

One of my early posts on this blog was a complete profile of Crystal Springs Rhododendron Garden.  I visited the garden two days ago, in the evening, and thought I'd share a few pictures from my walk.  Most of the Rhododendrons have not quite bloomed.  A few have, and I'm sure a lot of the others will be bursting into bloom very soon.  But there are lots of other things blooming, and of course the water fowl and other birds are always worth a visit to the park.

Official Greeter

Oregon Grape guarding the bridge

Oregon Grape


Canada Geese under the Blossoms

Japanese Maple

Colorful Trees

Fawn Lily

Fawn Lily

Fawn Lily and Lungwort


I didn't know what that blue flower with the spotted leaves was, until I went home and just happened to read a post over at Nature Nut Notes, a blog by NW Nature Nut (not to be confused with me, PDX Nature Nut.  So many nature nuts out there!)  It's nice to have such a community of Portland/Oregon/NW nature bloggers.

Wednesday, April 13, 2011

Creating a NW Native Landscape: Part Three - Out With the Old


In Part Two of this series, I gave you some ideas for planning a naturescape using native plants, which saves water, saves money, keeps the rivers cleaner, benefits wildlife, and does a lot of other good stuff.  This time, let's talk about how to get rid of the old landscaping and unwanted lawn.

First things first:  One of the best things you can do, to attract and provide for wildlife, and to reduce pollution in your immediate environment, is to replace lawn areas with native planting beds.  As I mentioned before, lawns require mowing (which usually means noisy, polluting power mowers), they tempt us to use all kinds of nasty chemicals to keep them looking their best, and they don't provide much in the way of habitat.  Sure, the neighborhood dogs may enjoy them, and the Robins may find some (hopefully chemical-free) worms in a lawn, but really - planting areas full of native trees, shrubs, flowers and groundcovers are much more interesting.  And they provide so much more for the local residents - feathered, furry, and otherwise.

In my yard, I wanted to remove about 75% of the existing lawn.   Partly for the reasons I already mentioned, but mostly - I must admit - I wanted to create a lower maintenance yard for myself.  Having less grass means less time spent mowing.  Also, the current lawn went right up to the building in places, and it went under the fence in the corner yard.  That meant trying to mow up against obstacles, and still having to break out the weed-eater to finish it off.  I use a human-powered reel mower on my lawn, which is great for reducing noise and air pollution, but it doesn't get as close to obstacles as some power mowers do (I still love it).

Before you start ripping out grass, have your final design plan in hand (or at least in mind).  When you're making your plan, you can use a rope or a hose to play around with different curves, representing the lawn/bed interface, until you settle on a design that you like.  Then use spray paint to mark your layout on the grass (they have cans designed specifically to spray upside-down). 

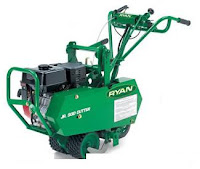
From the Johnson Creek Rentals website
When you're ready to remove the unwanted sod, there are two ways to do it.  The hard way (tried it - didn't like it), and the easy way (hurray for easy!).  The hard way involves pick axes, hoes, shovels and LOTS of time and muscle.  The easy way is to rent a sod cutter.  You can find them at almost any place that rents equipment.  I use Johnson Creek Rentals because they have what I need, they're friendly and knowledgeable, and they're in my neck of the woods.

Sod cutters look kind of like overgrown mowers, and they come in different sizes.  The most common sizes cut 12 or 18 inch rows in the sod.  I've used models that fit into a minivan's cargo area, in the bed of a small pickup truck, or towed behind on the smallest of tow hitches.  Don't be tempted to get a larger cutter than you really need, because larger models just require more strength to maneuver around the yard.  They do have power drives, but turning and guiding require a bit of muscle.

You can rent a sod cutter by the hour.  If you have your design marked out ahead of time,

Tuesday, April 12, 2011

Volunteers Needed: Audubon Sanctuary and Forest Park

Some great opportunities to help out with habitat restoration and trail maintenance in the Audubon sanctuary and Forest Park...


The Audubon Society of Portland is planning a volunteer work day in its sanctuary in Northwest Portland for the day after Earth Day.

The society's upcoming Together Green Volunteer Day will be held from 10 a.m. to 4 p.m. Saturday, April 23 at the sanctuary, 5151 N.W. Cornell Road.

Seventy volunteers older than 14 are needed, and children younger than 16 must be accompanied by an adult.
Refreshments and breakfast will be served before the project begins. The society will provide the tools and lunch. To sign up, contact Deanna Sawtelle via email or call 503-292-6855.

The Forest Park Conservancy is also planning two work days in Forest Park for the month of April.(4/16 & 4/22)

Monday, April 11, 2011

Red-flowering Currant: an Early-Blooming Oregon Native

Early spring blooms of the Red-flowering currant
Whether you're creating an all-native landscape or just looking to add some early interest to your yard, the Red-flowering currant (Ribes sanguineum) is one good choice.  It's a drought-tolerant NW native, and the abundant red to pink flowers that each shrub produces are a good source of nectar for many native pollinating insects (such as Mason bees).  The plant fact sheet from the NRCS says that Red-flowering currants also provide "...early spring nectar for hummingbirds and butterflies, forage for the larvae of more than two dozen species of moths and butterflies, and nesting sites or cover for songbirds and small mammals. Numerous birds including grouse, quail, robins, finches, towhees, and woodpeckers, and small mammals consume the berries." This deciduous shrub is also a good choice because of it's toughness and resistance to disease.

I used two Red-flowering currants in my native landscaping, and I couldn't be happier with them.  They've been problem free for the two years since planting them, and they've quickly grown from single small sticks to full, beautiful bushes.  I've caught glimpses of hummingbirds enjoying the blooms, but haven't been quick enough to catch them on camera yet. 

Red-flowering currant (left) about two months after planting

Red-flowering currants can grow quite large - 8 to 10 feet tall and wide, or more.   But if you know how to prune them, they can easily be kept to an appropriate size for almost any placement.  Since Red-flowering currants bloom on old wood, the best time to prune is just after blooming.  This encourages new growth and more blooms the next year.  Depending on how small you want to keep the bush, choose a pair of buds and prune just above.  You should also prune out any dead branches and a few of the oldest branches or canes every year.

Same bush one year after planting
This is the first year that I've had to think about pruning my currants, because they've just reached a size that suits their placement.  I think I'll maintain the one pictured at its current size (below), and let the other one continue to grow for a year or two, to create a little more of a screen.  It would be interesting to see it 12 feet tall, but I think about 6 feet would be ideal.  My bushes are still full of blooms at the moment, but I'll try to update this post when I prune, just to show how I did it.

The same bush two years after planting
For more information about Red-flowering currants, see this fact sheet from the NRCS, and this growing guide from Rainy Side Gardeners.


Friday, April 8, 2011

the Nature of Portland 3.0: Fresh Look

Well... I logged on this morning with the idea of creating a post about one of the native plants I've used in my yard, but suddenly my blog's design was looking a bit out-dated and old school to me. While there's nothing wrong with a retro look, I decided to spend some time instead, working on a fresh look with Blogger's updated Template Designer.

I'm fairly happy with the slick new look, but what do you think?  Feedback is always welcome.

Here's how the old design looked...


Maybe I'll get to that native plant post this evening.

Thursday, April 7, 2011

Creating a NW Native Landscape: Part Two - The Plan


In Part One of this series, we talked about all the benefits of creating a native landscape, or naturescape.  This time, let's jump right in to the planning!

I guess there are two basic methods for naturescaping, you can either rip out all the existing landscaping and start with a clean slate, or you can slowly convert your existing landscape into native species - plant by plant, and bed by bed.  Because I was starting with minimal existing landscaping - none of which looked very good - I opted to start fresh.  So the descriptions of my process will reflect that clean slate method.  That may not be what you choose to do.  It's certainly more intensive than creating a naturescape over time.

Either method you use, though - you need to spend a lot of time just thinking about your plan.  Think about your goals (water saving, creating a patio, shading a window, etc.), and think about your site (existing light/moisture conditions, will you be modifying the elevation or slope in any areas?).

When you're just starting out, you don't really need to be familiar with all the different native plant species.  Just think in terms of what size plants you would like in each location (large tree, small tree, shrub, flower, groundcover).  Then start by sketching a basic layout of your current yard.  You'll want to show the location and relative size of any plants that are staying.  Because I was ripping everything out, I just drew the building outline and hardscapes like the fences and sidewalks.  Once I had that on paper, I made lots of copies so I could play around with the design without having to re-draw the basics every time. 

One of my many sketches
Read on for things to think about as you develop your design...

Wednesday, April 6, 2011

Portland's Urban Growth Boundary: Battle Lines Being Drawn

Updated: 4/27/11 (update follows original post below)

When it comes to government and planning in the Portland metro area, there's possibly nothing as controversial as the Urban Growth Boundary (UGB).  Some Portland residents don't like the idea of increased density that the UGB encourages.  Farmers naturally want to preserve nearby farmland, and anytime there's a proposed modification or expansion of the UGB, the fur is sure to fly.


A lot of people, like myself, believe the UGB is a very good thing, overall.  Sure - any plan needs to have some flexibility, and seldom is anything perfect, but I'm a big believer in growing up, not out.  To protect natural habitat as well as farmland from willy-nilly development, to reduce transportation costs and emissions, and to create walkable communities within the city.  I believe the UGB is essential to preserving wildlife and the natural beauty of the region - some of the very reasons so many of us choose to call Oregon home.

The latest battle on the UGB front is forming in Washington County, and the stakes are high.  You can read about this new confrontation over at OPB News.  I, for one, will be watching closely to see how this one turns out.


HELVETIA -- The emerald quilt of farms and fields blanketing Helvetia doesn't form an obvious final battleground in the region's four-year effort to determine where it will and won't grow over the next half century.

But Washington County's decision to tap a 352-acre chunk of open land north of U.S. 26 for future industrial growth has now set just that stage. 
Read the rest of this update on oregonlive.com.

Tuesday, April 5, 2011

Why Blog About Nature in Portland?

As you can plainly see, from the nifty Outdoor Blogger Network badge - over there on the right side of this blog - I am a member of the Outdoor Blogger Network (OBN).  The OBN is a great way for outdoor bloggers, outdoor enthusiasts of all kinds, and would-be outdoor blog readers to connect and discuss the things they love.

A post on the OBN website recently asked the question: "Why do you blog about your outdoor experiences?"  I'm only about two months into this, my first blogging experience, but I thought I would take a couple of minutes to answer that question for myself, and for my fledgling group of readers.

So... why blog about nature at all?

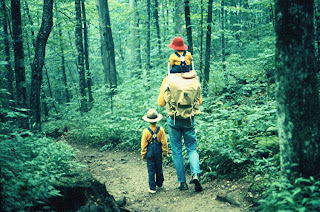
That's me in the red hat, on my way to Crabtree Falls
I guess I have my parents to thank for instilling in me a love of nature when I was small.  I was one of those babies in a backpack, bouncing along the trails from the Appalachians to the Ozarks, on one set or another of my parents' sturdy, nature-lovin' shoulders.  When I was old enough to leave the backpack behind, I roamed freely through the woods, streams, and meadows that surrounded our house.  I knew all the best places to find salamanders, snakes, crawdads and mud.

OK, but why the Nature of Portland?

Fast-forward a couple of decades (OK, maybe three decades if you really have to know), and now I'm on the opposite coast, living in Portland, Oregon.  I still love nature - and Portland is a great place for city dwellers that do - but I don't get as much time out in the woods as I would sometimes like.  That's why - about three years ago - I started the Nature of Portland photo group on Flickr.  I wanted to create a place where people could share all of their great photos highlighting Portland's naturey goodness.  Then I could just immerse myself in our city's natural side any time I felt the need.

The photo group really took off, and today it hosts almost 2,000 images of nature around the Portland metro area.  And while Flickr groups do have an area for discussion, most people are there to post or view photographs.  I felt like there was more I could do, to share my love of nature and my beautiful city, with other folks with similar interests.  I wanted to really showcase the parks and natural areas around our city, share news that affects Portland's nature, and profile some of the northwest native plants and animals that share our space.  I figured the best way to do that was to create a companion blog for the Nature of Portland photo group.

I already had the name, but it took me about two more years to think about what I really wanted to do with the site, settle on a platform and design, and finally decide to make it happen.  I'm really enjoying it so far, and I hope to build my blog into something that's interesting for any nature lover, and resourceful for all the local nature-ophiles.  And the Outdoor Blogger Network is there to help me make that happen.

Monday, April 4, 2011

Portland's Waterfront: Cherry Blossoms

Signs of Spring are popping up - and open - everywhere!  From Trilliums at Tryon Creek, to the Red flowering currants in my yard, things are starting to come alive.

Just a quick post to encourage everyone to go see the beautiful cherry blossoms right now along Portland's waterfront (between the Steel and Burnside bridges).  For East-siders like me, park near the Rose Quarter (or bike, or take MAX to the Rose Quarter stop), and walk to the Eastbank Esplanade where it meets the Steel Bridge.  Take the pedestrian level of the bridge across the Willamette for some incredible views!  My camera really doesn't do them justice, but here are a few I took yesterday (4/3/11).


View Larger Map

Saturday, April 2, 2011

Tryon Creek Trillium Festival: April 2-3

Pollen | by p medved on Flickr
Originally published March 30, 2011

It's Spring, which means wildflower season is upon us!  
Trilliums are one of the most spectacular wildflowers in our area, and a great place to see them right now is Tryon Creek State Natural Area
by the Oregon State Parks Team:
Tryon Creek State Natural Area is a prime place to see trillium blooms. And this year’s cool, wet weather has filled the park with white blossoms.

You’ll be delighted with the setting for the 31st annual Trillium Festival, April 2-3. The festival runs 10 a.m.-4 p.m. each day and features a native and hardy plant sale. Join a guided hike along the trails to see the trilliums in bloom.  Hikes begin at the nature center at 10:30 a.m. and 1:30 p.m.
 
You can also buy art for your garden and goodies from the Trillium Market. The sales support the Friends of Tryon Creek and its volunteer interpretive program.
More info:

Update: April 2nd, 2011

We went over to the Trillium Fest this afternoon, and enjoyed a little live music on the porch of the Nature Center, overlooking the woods.  I picked up a couple new native shrubs from the plant sale, and we had some tasty fry bread tacos.  They've got some great garden art for sale, too.  The shuttle from Riverdale High School came by every 15 minutes, so parking was a cinch.  Even the weather cooperated for us, and only started sleeting when we were leaving.

The forecast looks like it might be drier tomorrow, so head on over for day two of the Festival!

A few pics from today...

Where to?

Music on the Porch

Native Plant Sale

Fry bread tacos and Hand-dipped corn dogs!

Trilliums - the Stars of the Show


Well-used snag

    Real Time Analytics